Stop-Loss Placement Using Volume Profile

Volume Profile can help define where a trading idea becomes invalid, but it cannot guarantee that a price level will hold. Start with a clearly selected profile window, identify the relevant structure, and calculate position size from the resulting stop distance.
On LuxAlgo’s native charts, use the available profile tools for analysis and Quant to implement testable rules. Verify that the strategy has access to the data and calculations it needs; a visible chart overlay is not automatically an input to every backtest.
Understand the Main Profile Levels
A volume profile distributes recorded volume across price rows over a chosen window. The result depends on the data feed, window, session, and row settings. TradingView’s profile guide explains these common reference levels:
- High Volume Node (HVN): an area of relatively high recorded activity.
- Low Volume Node (LVN): an area of relatively low recorded activity.
- Point of Control (POC): the row with the highest volume in the selected profile.
- Value Area: the price area containing the chosen share of profile volume, often set to 70%. VAH and VAL are its upper and lower boundaries.
These describe historical activity. A node can be a useful reference for a hypothesis about support or resistance, but neither its label nor the amount of previous trading guarantees the next reaction. A 70% value area is not a 70% probability that price will remain inside it.
Choose the Profile Before Choosing the Stop
Define the window consistently. A completed prior-session profile, a rolling window, and the currently visible chart range can produce different levels. If you change the window after seeing a trade fail, you change the rule being evaluated.
For historical testing, use only levels available at the decision time. The final POC of a session was not necessarily known halfway through that session. A visible-range profile can also change when the chart is panned or zoomed, so a reproducible strategy needs an explicit range definition.
Use Nodes to Define Invalidation
| Trade idea | Possible rule to test | What must be specified |
|---|---|---|
| Long near an area treated as support | Exit below the defined support zone and buffer | The zone boundaries, trigger type, and buffer |
| Short near an area treated as resistance | Exit above the defined resistance zone and buffer | The zone boundaries and quantity at risk |
| Breakout from a balance area | Exit after a defined failure to remain beyond the boundary | Whether failure means an intrabar touch or completed-bar close |
| Trend continuation | Trail behind a defined sequence of confirmed structures | When levels become confirmed and whether the stop can move backward |
“Below the nearest HVN” is not a complete strategy. The nearest node may have little relevance to the entry thesis. Similarly, placing a stop “before an LVN” does not confirm a breakout; a stop is an exit instruction, while breakout confirmation is an entry or continuation condition.
The POC is also not automatically an ideal stop. In a balanced market it may sit inside the area where price repeatedly trades. Decide what price behavior invalidates the idea, then assess whether a profile level provides a useful reference for that decision.
A Worked Stop and Sizing Example
Suppose a completed profile shows a support zone from $98 to $99. A hypothetical long trade enters at $100 and uses $97.50 as its invalidation stop, placing a $0.50 buffer below the zone. The initial distance is $2.50 per share.
With a $250 planned monetary allowance, the quantity is 100 shares before costs. If round-trip costs and an execution allowance total $0.10 per share, 96 shares use $249.60 of the allowance. Check the purchase price or margin requirement as well.
This calculation does not guarantee a $250 maximum loss. If the exit fills at $96, those 96 shares lose $384 before other costs. The SEC’s stop-order bulletin explains why a stop trigger and execution price can differ. A stop-limit order has a different tradeoff: it may remain unfilled.
Buffers, Trailing Rules, and Multiple Timeframes
A volatility buffer can make the invalidation rule more explicit. For a long position, subtract the chosen buffer from the relevant lower boundary; for a short position, add it to the upper boundary. If using ATR, define its timeframe, reference bar, and multiplier. Do not simply add ATR to every level regardless of direction.
Widening a stop while keeping the same quantity increases planned loss. Recalculate exposure when changing the rule. A one-way trailing stop should rise only for longs or fall only for shorts; a newly calculated profile level does not automatically satisfy that constraint.
Higher-timeframe profiles can provide context, but weekly, daily, and four-hour settings are not a universal hierarchy. Overlapping levels or a Fibonacci retracement can supply another condition to test, not proof of a stronger barrier. Avoid counting several closely related observations as independent evidence.
Native Volume Profiles in LuxAlgo
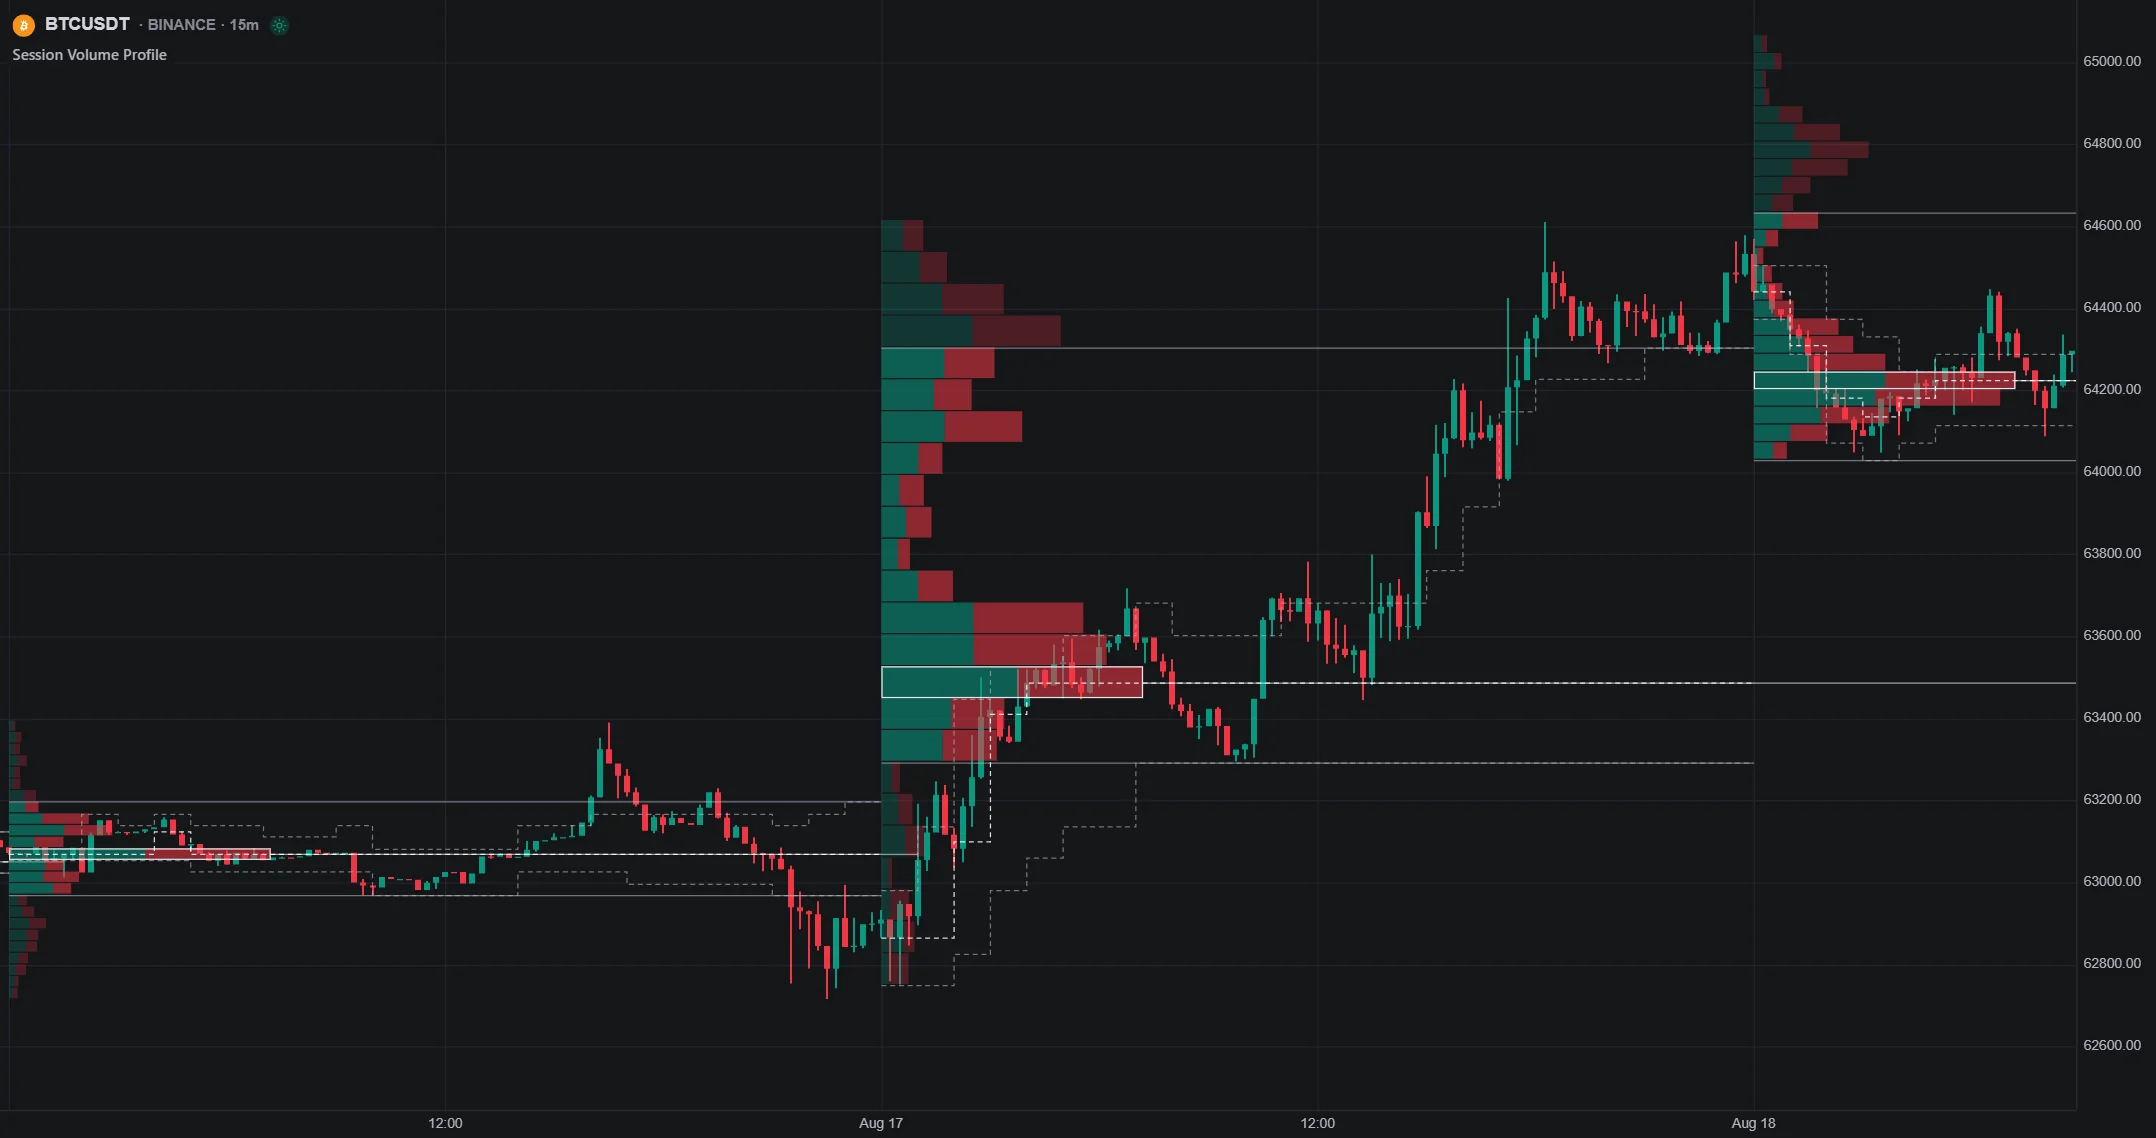
Add profiles from Indicators → Orderflow. The native profile documentation distinguishes three variants:
- Session: profiles for defined sessions, with POC and value-area levels and developing traces.
- Rolling: a profile over the newest selected number of bars.
- Visible Range: a profile of the bars currently on screen that changes with panning and zooming.
Session and rolling profiles use footprint data and retain the buy/sell split by row. Visible Range uses candle volume and colors activity by bar direction, rather than aggressor side. Check symbol data availability before comparing them. These distinctions also matter when reproducing a chart-based idea in code.
Money Flow Profile in the Library
The open-source Money Flow Profile offers volume or money-flow profiles, sentiment settings, and configurable rows over a selected range, one click from a Quant Chart. Its polarity method is a calculation choice. Do not interpret every colored row as verified institutional buying or selling, or assume it is identical to a footprint-based profile.
Test the Stop Rule With Quant
Describe the profile construction, entry, invalidation boundary, buffer, and sizing method in Quant. Use the Code, Review, and Run workflow to inspect the implementation. If the required historical profile data is unavailable, a candle-volume approximation must be identified as such rather than presented as an exact reproduction.
- Check timing: confirm that the code uses only information available when each decision is made.
- Inspect trades: compare entries, calculated stop levels, and simulated fills against the chart.
- Include costs: review commission, slippage, order size, and other simulation properties.
- Compare alternatives fairly: keep entries and data consistent when evaluating a profile stop against a fixed or ATR-based exit.
- Reserve unseen data: assess the chosen rule outside the period used for tuning.
A stop-hit rate alone is insufficient. Define what counts as a premature exit and examine net return, drawdown, average loss, and trade count. There is no universal 22% reduction in false exits, 18% return improvement, or 27% Sharpe-ratio improvement from these methods.
Two hundred trades or fewer than five parameters does not guarantee robustness. Monte Carlo analysis can be a separate research technique, but should not be assumed to run automatically in Quant. Use LuxAlgo Journal to review supported trading records and notes alongside the original plan.
Video: Stop Loss Placement With Volume Profile
Trader Dale demonstrates a profile-based approach to stop placement. Treat the examples as a method to evaluate with your own rules and execution assumptions, not a guarantee that a node will hold.
FAQs
How to effectively use Volume Profile?
Choose a consistent window and data source, identify the relevant activity zones, and define how price must behave to invalidate your trade. Calculate quantity from the resulting stop distance and costs. Test the complete rule using levels available at the decision time, and remember that historical volume does not guarantee support, resistance, or a fill price.
Read next